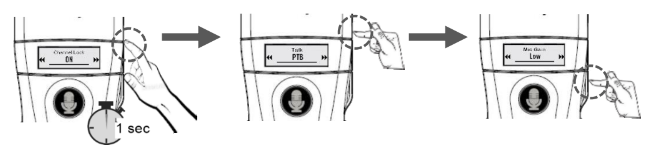
a. Check whether the transmitter is programmed for a EU or US frequency. The battery compartment should include a sticker with the marking – C416 for the EU, D119 for US. b. Go to the transmitter settings panel by pressing △ and the power button on the transmitter side simultaneously.
c. Select the setting using △ ▽. Confirm by pressing the power button. d. Then select the following settings for the transmitter OTG-102T:
Channel Lock – ON
RF Power – LOW for EU transmitter, HI for US transmitter
Audio Priority – OFF
ADNR – OFF
Mic. Gain – 3
Set RX Off – OFF
Okayo Connect – ON
e. After the last setting, the device will turn on automatically. f. Turn the transmitter off, keeping the power button pressed until the display turns off. g. If you would like to use a second transmitter to communicate with your group, start it up acc. to the steps a ~ f.
2. Default settings of the OTG-102R EUUS receiver
a. If you are not certain of the options available on the OTG-102R receivers, return to factory settings. b. Press simultaneously the buttons △ ▽ and the power button. The receiver will restart, the display should show the following data: G88 88, C416 OR D119. This means that the receiver was returned to factory default settings.
3. Synchronising OTG-102R EUUS receivers with the OTG-102T transmitter
a. All devices must be off before the synchronisation. b. On the transmitter, set the switch to T1. c. The transmitter and the receivers must be beside each other during synchronisation. The maximum distance between them is 2 m. d. d. Press simultaneously the red CALL button on the transmitter front and the power button on the transmitter side. e. Within three seconds, select the channel using △ ▽, then confirm the choice by pressing the power button.
The transmitter LED will start blinking. The transmitter will commence sending the pairing signal to the receivers.
f. Now start up the receivers one by one using their power buttons.
During synchronisation, the receiver changes their frequency band to EU or US (depending on the band of the transmitter).
The receiver display will show its individual ID number.
g. If you would like to work with two receivers on the same channel, start up another OTG-102T transmitter according to item „1. Select settings for transmitter OTG-102T” and „3. Synchronising OTG-102R EUUS receivers. Perform all steps except turning on the receivers. h. Set up the second OTG-102T transmitter the same way as the first one; when set up on the same channel, it will download the list of synchronised receivers.
i. Press the red CALL button on the transmitter front for a short time (if you turned on two transmitters, press CALL on both of them). The receivers have been synchronised with the transmitter. The devices are ready to work.
If you turn on two transmitters, remember to set the switch on the other one to T2!
j. The transmitters and receivers store the synchronisation and operation settings after shut-down and restart. When the set is turned on again, all it takes is to switch each device on using the power button.
If you would like to create a set composed of other OTG-102R receivers or OTG-102T transmitters (EU or US) you have to resynchronise the receivers with the transmitter!
k. If the microphone button would be lit in red, this means that the transmitter is muted. Short-press the microphone button. The button will turn green and this will mean that the microphone is switched on. l. There is a loudness adjustment unit on the receiver housing side to control the volume. Note its position.
4. Connecting a microphone to the transmitter and headphones to the receiver
a. The microphone jack on the transmitter is found beside the T1/T2 switch. Connect the microphone here. b. The headphone jack on the receiver is found on the top beside the antenna. Connect the headphones here.
5. Changing the channel while the OTG-102 system is in operation
a. Synchronised groups allow e.g. searching for channels free of interference with automatic channel adjustment on all receivers. b. b. Press and hold simultaneously the microphone and CALL buttons on the transmitter T1. The unit will search for a channel without interference, and select it for all receivers in transmission range.
Note: The transmitter T1 will start in “Roll-Call” mode to monitor the channel status change on the receivers.
c. Wait a moment until the transmitter reaches all receivers in range.
If any receivers were out of range during this operation or were off, then they need to have their channels changed manually to the number found by the transmitter.
d. Short-press the CALL button to end the operation. e. Select the same channel manually on the other transmitter T2.
6. Managing equipment operation time
a. The Okayo OTG-102T US Ready transmitter can work on a fresh battery set for ca. 15 hours . b. The Okayo OTG-102R US Ready receiver can work on a fresh battery set for ca. 45 hours. c. Before starting to use the communications system, check the battery levels. The battery indicator is found on the display, or as a LED on the unit.
7. Shutting down / turning on
a. Press and hold the power button for three seconds on a device to turn it off or on. b. Receivers turn off automatically after 20 minutes if they do not receive any transmitter signal (option switchable in the receiver settings panel).
8. Troubleshooting
8.1. The transmitter display shows NO DATA
No paired devices. Pair your group before starting work.
The transmitter T2 does not have access to advanced functions.
8.2. The transmitter display shows NOT APPLICABLE
Option available only following pairing of devices with access to advanced settings for a transmitter set as T1.
8.3. The transmitter display shows VOICE DETECTING
In order to improve listening, this message shows up on the display of the transmitter each time it is turned on.
8.4. Why can’t the transmitter T2 download the list of paired devices from tramistter T1?
Check whether both transmitters have the same channel selected.
Check whether the T1/T2 switch on transmitter T2 is set to T1 per the instructions under Pairing transmitter T1 with transmitter T2
Restart the transmitter T2.
8.5. Why does the receiver not sound the alarm caused by the transmitter T1?
Check, whether the receiver is on.
Check, whether the receiver is on the paired device list on the transmitter T1.
Check, whether the receiver is in range of transmitter T1.
8.6. Why does the receiver does not sound the range loss alarm?
Check, whether the alarm is turned on in the receiver settings.
8.7. Why doesn’t the receiver hear the transmitter?
Check, whether the headphones are properly connected to the receiver.
Check, whether the loudness is properly set on the receiver.
Check, whether the transmitter is muted.
Check, whether the channels on the transmitter and receiver are the same.
Check, whether the receiver is in transmitter range.
Check receiver diode status.
Check, whether the receiver is synchronised with the transmitter.
8.8. Why is there a problem with the transmitter?
Check, whether the microphone is connected properly to the transmitter.
Check, whether the transmitter is muted.
Check, whether you have only two transmitters on the same channel, and whether the switch is set to T1 for the first, and T2 for the second transmitter.
Check the volume settings in the transmitter control panel.
Reduce or turn off the ADNR function in transmitter settings.
Check transmitter diode status.
Search for an interference-free channel and change it for the group.