


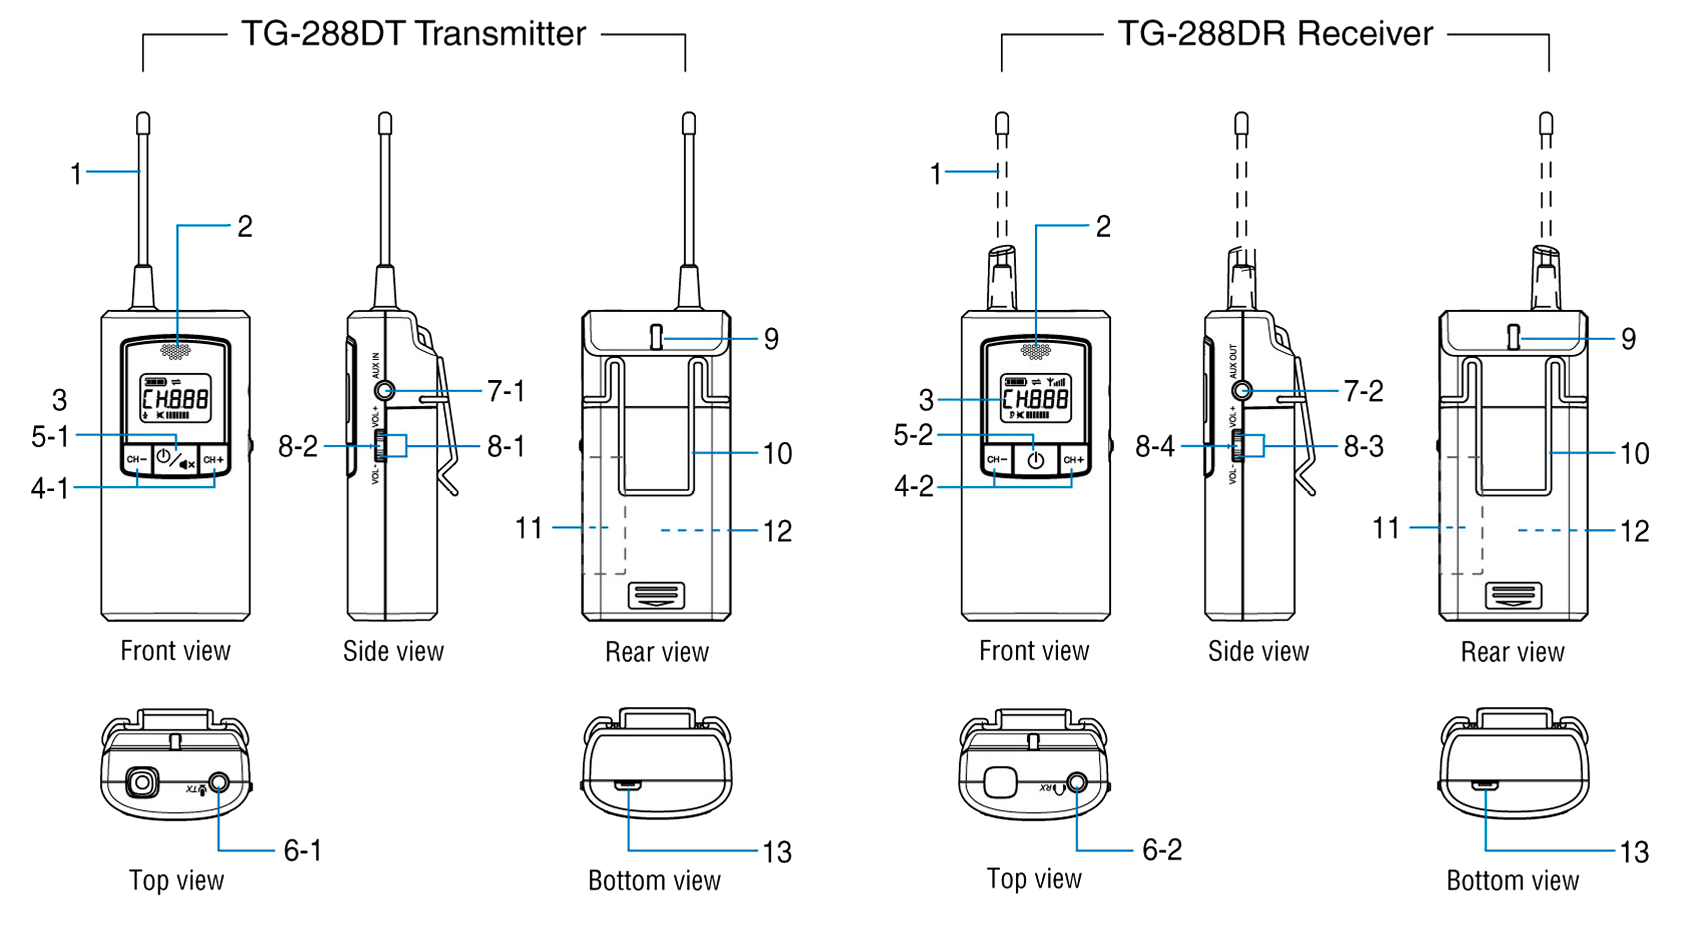


- Press and hold the power button
 for 2 seconds to turn on the system. The LCD display will illuminate and retrieve the channel number used last time to indicate Power on successfully.
 - Press and hold the power button for 2 seconds to turn the Power off completely.
Note: Energy saving- Receiver will automatically power off if no signal is received after about 20min.
The channel is preset to ![]() . If you wish to select a different channel, press
. If you wish to select a different channel, press ![]() and
and ![]() buttons simultaneously for 2 seconds. The
buttons simultaneously for 2 seconds. The ![]() sign starts flashing, then press
sign starts flashing, then press ![]() or
or ![]() button to select your desired Press
button to select your desired Press ![]() button briefly to confirm the selected channel or wait for approximately 5 seconds to automatically store the selected channel.
button briefly to confirm the selected channel or wait for approximately 5 seconds to automatically store the selected channel.
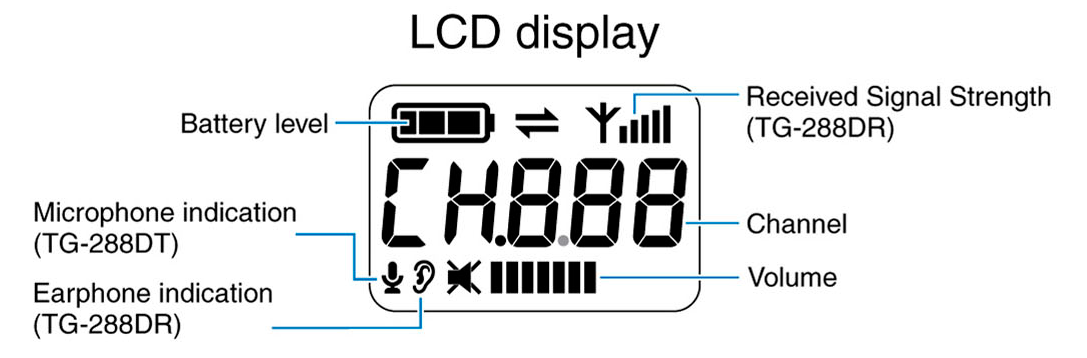
Note: Make sure that the transmitter and receiver(s) operate on the same channel. This symbol ![]() will appear to indicate that the receiver is receiving a good signal from the transmitter. The receiver display will keep flashing when no transmission signal is being received. (Q & A-O2)
will appear to indicate that the receiver is receiving a good signal from the transmitter. The receiver display will keep flashing when no transmission signal is being received. (Q & A-O2)


- Transmitter mic volume is preset at level 4

- Press down and up the
 button to decrease or increase the volume level. There are 4 adjustable levels from to
- Press mute button briefly to mute the transmitter, press the same button once again to recover.

- Receiver earphone volume is preset at level
- Press down and up the
 button to decrease or increase the volume level. There are 8 adjustable levels from
  to
to - The LCD display indicates no volume and in mute mode.
- When battery icon is displayed at fully autonomy
 the battery contains sufficient power.
 - When the battery icon is displayed as empty and flashing
 , this indicates low battery and only 5-10% battery remaining. Please replace a new battery or charge the rechargeable battery immediately via USB certified traveling charger (optional accessories) or appropriated Linkx charger station.
 - The charging current is set to 255 mA. For safety precautions, there is a safety timer that will terminate charging after 12 hours of continuous charging. Full charge battery provides approx. 14 hours of continuous operation for receiver and 12 hours of continuous operation for transmitter; however, please note that actual battery life varies based on user setting, usage patterns, environmental conditions, batteries’ manufacturer and other factors.
- While charging, the battery icon displays on LCD
 back and forth.
Note : The transmitter or receiver will shut down automatically when charging is taking place. If you want to use the system while it’s charging, simply press the power button again to turn the system back on.

- To activate the two-way mode, press the center of the 3-way lever switch on the side of the transmitter for 3 seconds or the external headset’s two-way talk button for 3 seconds. The two-way mode icon “
 “.
“. - Attach the earpiece of the headset to your ear and press the “
 ” button to adjust to appropriate earphone volume.
 - Confirm that the receiver has heard the transmitter loud and clear.
- Press the same 3-way lever switch or the talk button again for 3 seconds, or unplug the headset to end this two-way communication function. The two-way mode icon will then disappear.

When using an external headset HMR-18 or LMR-18
- The Talk button is located on the center of the 3-way lever switch.
- The receiver can make speech by press & hold the Talk button and speak to the built-in microphone on top. The two-way icon “” will flash when one of the receiver’s Talk button is pressed.
- The earphone can hear the sound of its
own and the sound from the transmitter
and other receivers. button - Release the Talk button after the end and allow next receiver to speak.
⚠ The built-in microphone can only be used in two-way mode.

Use built-in microphone and external earpiece
- The Talk button is located on the center of the 3-way lever switch, Receiver
or it is the push button on the external headset. - The receiver can make speech by press & hold the Talk button and speak to the built-in microphone on top. The two-way icon “”
will flash when one of the receiver’s Talk button is pressed. - The earphone can hear the sound of its own and the sound from the transmitter and other receivers.
- Release the Talk button after the end and allow next receiver to speak.
⚠ The system only allows a single receiver to speak at the same time.
